
This time, however, nosotros volition operate exclusively hover as well as CSS. To encounter how it works, delight take in the prove blog:

How to Add CSS Image Slider alongside Thumbnails inwards Blogger
Step 1. Log into your Blogger Dashboard as well as become to "Template" > press the "Edit HTML" button.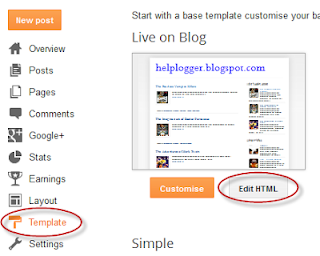
Step 2. Click anywhere within the code surface area as well as press the CTRL + F keys to opened upward the Blogger search box

Step 3. Paste the </head> tag within the search box as well as striking Enter to detect it.
Step 4. Just higher upward the </head> tag, add together the CSS code:
<style type='text/css'>Here nosotros laid a specific elevation of 530px then that nosotros tin slide an ikon out of the container margins as well as laid the overflow value to hidden.
.image-container {
position: relative;
width: 100%;
height: 530px;
margin: 0 auto;
text-align:center;
overflow: hidden;
}
.image-container a {
display: inline;
text-decoration: none;
}
/* Mini-thumbnails mode */
.mini-thumbnail {
width: 18.4%; /* mini-thumbnails width */
margin:1px;
opacity: 1;
-webkit-box-shadow: 0px 0px 3px rgba(0,0,0,0.5);
-moz-box-shadow: 0px 0px 3px rgba(0,0,0,0.5);
box-shadow: 0px 0px 3px rgba(0,0,0,0.5);
}
/* Style for the principal thumbnail */
.large-thumbnail {
position: absolute;
width: 100%;
top: 800px;
margin:0 auto;
text-align: center;
display: block;
-webkit-transition: locomote yesteryear 1s ease;
-moz-transition: locomote yesteryear 1s ease;
-o-transition: locomote yesteryear 1s ease;
-ms-transition: locomote yesteryear 1s ease;
transition: locomote yesteryear 1s ease;
}
.feature {
top: 85px;
width: 100%;
opacity: .3;
}
/* mode for the selected mini-thumbnail */
a:hover .mini-thumbnail {
opacity: .5;
-webkit-box-shadow: 0px 0px 10px rgba(0,0,0,0.5);
-moz-box-shadow: 0px 0px 10px rgba(0,0,0,0.5);
box-shadow: 0px 0px 10px rgba(0,0,0,0.5);
}
/* transition effects for the selected ikon */
a:hover .large-thumbnail {
top: 85px;
width: 100%;
z-index:3;
opacity: 1;
-webkit-transition: locomote yesteryear 1s ease;
-moz-transition: locomote yesteryear 1s ease;
-o-transition: locomote yesteryear 1s ease;
-ms-transition: locomote yesteryear 1s ease;
transition: locomote yesteryear 1s ease;
}
</style>
The position: absolute of the larger thumbnails (.large-thumbnail) pulls them out as well as places them inwards the spot that we've chosen using a value of 800px for the top property.
The mini-thumbnails which are genuinely a minute image, remain all the fourth dimension higher upward inwards a static set as well as are slightly modified exclusively inwards price of mode for distinguishing the active (a:hover .mini-thumbnail) on mouse over.
Step 5. Save the changes yesteryear clicking the "Save template" button.
And finally, nosotros ask to add together the HTML code.
Step 6. Paste the below HTML construction to where you lot desire to display the gallery yesteryear going either to the "Layout" page as well as add together a novel gadget (click on the "Add a gadget" link as well as select "HTML/JavaScript"), or within a post or page within the "HTML" section.
<div class="image-container">The javascript:void(0); leaves the link empty exactly you lot tin add together i if you lot want. Just supervene upon javascript:void(0); alongside the URL of your page/post.
<a href="javascript:void(0);">
<img class="mini-thumbnail" src="MINI-THUMB-URL1" />
<img class="large-thumbnail" src="LARGE-THUMB-URL1" />
</a>
<a href="javascript:void(0);">
<img class="mini-thumbnail" src="MINI-THUMB-URL2" />
<img class="large-thumbnail" src="LARGE-THUMB-URL2" />
</a>
<a href="javascript:void(0);">
<img class="mini-thumbnail" src="MINI-THUMB-URL3" />
<img class="large-thumbnail" src="LARGE-THUMB-URL3" />
</a>
<a href="javascript:void(0);">
<img class="mini-thumbnail" src="MINI-THUMB-URL4" />
<img class="large-thumbnail" src="LARGE-THUMB-URL4" />
</a>
<a href="javascript:void(0);">
<img class="mini-thumbnail" src="MINI-THUMB-URL5" />
<img class="large-thumbnail" src="LARGE-THUMB-URL5" />
</a>
<a href="javascript:void(0);">
<img class="large-thumbnail feature" src="LARGE-THUMB-URL1" />
</a>
</div>
To add together pics within the ikon slider, supervene upon MINI-THUMB-URL as well as LARGE-THUMB-URL alongside ikon URLs. Note: The in conclusion LARGE-THUMB-URL1 should hold out replaced alongside the URL of the default ikon that volition look on your slider.
If you lot don't know how to teach the images URL, take in this tutorial: How to upload images as well as teach their URLs.
Now, Save your widget/gadget or issue your page/post as well as you're done adding the CSS ikon slider alongside thumbnails inwards Blogger.
Comments